Wednesday, June 16, 2010

Father's Day Ideas

Need last minute Father's Day Ideas??? I found a cute blog called DollarStoreCrafts. It is such a cool blog with LOTS of fun ideas for not too expensive!
Here are some examples for the big day...
This is an awesome shirt that dad would be proud to wear ;)

I LOVE this idea! And at first I was thinking you could only do this if you had 3 kids, but you could definitely do three different pics of one kiddo!

My husband would absolutely LOVE these adorable golf cupcakes!
This frame would be perfect if you want something that has some more personality in it! SO cute!
Good luck and Happy Father's Day to all you great dads out there!

Tuesday, June 15, 2010

Wall Murals

There are some pretty amazing murals that would be awesome to have, but are just too expensive. Like these gorgeous murals by the Decor Place. Amazing...

But this one was actually done by hand. And you can see a tutorial that gives you a step-by step guide to do-it-yourself here at Mafe Maria! How amazing would it be to say that you did the mural in your little boy's room? I just wish I had the time, and patience! Maybe someday....

Smashbox Cosmetics= FREE $16 Gift + FREE Shipping+ FREE Samples!


This is what I got last time they had this amazing deal! JET SET WATERPROOF EYE LINER


The JET SET WATERPROOF EYE LINER and let me tell you... I LOVE it! I like to put my eyeliner in the lower inner lid, and this stays on better than anything I have used! It's great. And I would have spent the money anyway, so might as well get FREE SHIPPING AND FREE GIFT with it all too!

Smashbox Cosmetics offers up a FREE gift with ANY order from 9am-2pm PST, every Tuesday and Thursday! Today (until 2pm PST) they are offering up a FREE Mini Eye Shadow Trio in Headshot ($16 Value)! You can see all the details about this special promotion here.


On top of that promo, you can sign up to be a Pretty Points member. This is a FREE Rewards program Smashbox offers up. By signing up, you’ll score many perks! Your purchases will earn you points for FREE rewards certificates, you’ll score a FREE gift set during the month of your birthday, and a bonus deluxe sample will automatically be added to all of your Smashbox orders + you’ll score FREE shipping with every order!

After signing up for their rewards program, choose an inexpensive item from their Curtain Call collection here. They have items priced as low as $10. Once you start the checkout process, you’ll get to choose from 3 deluxe samples + you’ll get an additional bonus sample. Enter your payment info and complete your order. On the order confirmation page, the FREE $22 gift and the Pretty points bonus deluxe sample will show up. Your total will be as low as $10 + tax shipped! I LOVE these Smashbox cosmetics deals! If you do them on a regular basis, you will be stocked up on high quality cosmetics for very little money out of pocket!
To sweeten this already sweet deal further, go thru Shopathome.com! You’ll get a $5 sign up bonus if you’re a new member and 4% Cash back from your Smashbox Cosmetics purchases! Just go on over here and login or register, then in the store drop down menu find Smashbox.

Monday, June 14, 2010

*Honey Lime Chicken Enchiladas*

These are absolutely the most delicious enchiladas I have had in a VERY long time!
If you like sweet meat in your enchiladas you will LOVE this! The hubby just about died when he tasted how great they were! And the amazing thing is they are pretty simple too, and let's be honest we could all use some more simple in our lives!

So here goes...
Honey Lime Chicken Enchiladas
6 Tbsp honey
5 Tbsp fresh lime juice (1-2 limes)
1 Tbsp chili powder
1 tsp garlic powder
2-3 skinless, boneless chicken breasts, cooked and shredded
8 – 10 flour tortillas (depending on size)
1 lb of a Mexican blend cheese (monterey jack, colby, cheddar), shredded
1 large can of green enchilada sauce

Mix the honey, lime juice, chili powder and garlic powder together with the shredded chicken.  Allow it to sit for at least 1/2 hour or you could do it hours before and just cover and refrigerate.
Pour 1/2 cup of enchilada sauce into bottom of a 9 x 13 pan.  Place chicken and cheese into middle of a tortilla and spoon about 1 tablespoon of enchilada sauce over it and roll up.  Place seam down in the pan.  Reserve about 1-2 cups of cheese to sprinkle on top of enchiladas.  Pour enchilada sauce over the top of rolled enchiladas (reserve a little bit to add after they are baked) and sprinkle with remaining cheese.

Bake at 350 degrees for about 25 minutes or until lightly browned and bubbly.

I got this recipe from another blog (thanks HomeBasedMom!!) and it is a great recipe but it calls for cooked, shredded chicken. So I decided to take it a step further and cooked it in the crockpot to make it easier. And to add the flavor to the chicken, I put the honey, chilli powder, lime juice, and garlic powder in the crockpot too. I cooked it on high for about 3 hours. It gave the chicken a delicious flavor since it was all cooked together. I think when I do it again though, I will add just a little more lime to the end prduct before I put it in to cook, because I love the lime flavor, and I think it cooked out a little more in the crockpot. But VERY delicious and we will be seeing this dish around a lot more!!

Tai Pan Trading Deal

You can go to this website and print off a coupon for Tai Pan's Tent Sale! You get an additional 25% off! I love Tai Pan and their stuff isn't expensive, so this is a great deal!
Hurry though, it is only good through June 19th!
You can also go to their website and sign up to be on their mailing list, and you will get coupons like these emailed right to you!

Monday, September 21, 2009

So sorry for the delay!

So I guess moving delayed sharing my creations with all of you a lot more than I expected. For that I am sorry! But I am going to start posting a lot more I promise! A lot has happened since my last post, and for one I decided to become a consultant for Close To My Heart. It has really been a blast! I just love having the gatherings because we get to have the very much needed "Mom/friend Talk Time"! It is so fun to see some of my friends and catch up on girl talk once a month! That is really why I started all of this in the first place!

Anyway, I just want to share with you what we made last month! It all turned out so great!
All of this is done with the "Boom-di-ada" Level 2 Paper Packet,
The My Acrylix stamp of the month for August "It's Your Day,"
And the Hollyhock, Barn Red and Olive Stamp sets, (and added embellishments:)
These are the different cards we made. I love this stamp set! Birthday cards are always needed around my house, and I think these ones turned out pretty cute!


And the scrapbook pages! This Paper Packet was perfect for some summer pics I needed to put together!

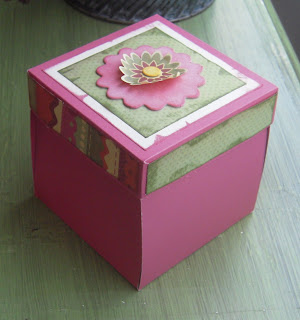
And last, but definitely not least, my FAVORITE part of the night....
I call it my "Explosion box" because you take off the lid and an explosion of pictures are inside. I obviously need to put pictures inside, but you get the idea! It is so fun to make cool things like this too! If anyone wants to know how this is done, let me know and I will post a short tutorial!!

Monday, April 20, 2009

Fun To Make and Give...


So here is my latest creation! I was really quite surprised that it turned out as cute as it did.
My sister-in-law is prego and going to have a baby like any minute now, and I wanted a cute blanket, but not the same old thing. So I came up with this. 
Here is what you need;
-Half yard of Fleece
-Matching Yarn {I actually used two different colors for around the stars too, but you don't have to}
- Two different colors of Matching Felt {Make sure it is machine washable}
-Scissors
-Needles big enough for yarn
-Paper
Just 4 easy steps to follow below...
1. Start by going around the blanket with a Blanket Stitch. If you're not sure how to do this, I found a great tutorial to learn how on YouTube.

2. Cut out a pattern on white paper of the shape you want to embellish your blanket with. Then take the white paper pattern and trace it onto the felt, cut it out.
3. Now just like you did on the blanket, do the same stitch around the stars to give them an adorable finished look. 


4. Then stitch around the stars just going through the fleece and the stitch on the stars, so you won't see a stitch on the actual star itself. Mine definitely is NOT perfect, but I think it looks pretty good for a first time job!

Good Luck!